Categories

Blog posts about QNAP's products and technologies.
Whenever a new Mac comes out, choosing the right hard drive capacity is usually the biggest headache.
Unless you’re purchasing a high-end Mac Pro, a typical Mac usually comes with only a single hard drive, which is the system drive. Take the Mac Mini as an example: the most basic model comes with 256GB of storage, and upgrading to a higher capacity can be quite costly. For those who are curious, you can visit Apple’s official website to compare the prices of the 256GB and 512GB models. You’ll often find thatthe additional cost is enough to cover the cost of a NAS and an external hard drive.
Even if you’re willing to spend that extra money, storing your system and data on the same drive has never been a good idea. For one, the backup strategy can easily be disrupted; for another, it puts additional load on that only drive in the system.
This is why an increasing number of Mac users are considering using a NAS to expand their storage capacity. Asides from being more cost-effective, there are several other reasons:
1. External Drives Are Hard to Connect
Macs have very few native expansion ports, and some models even have only a single USB-C port. Even when using expansion devices to connect external drives, cable management can become quite cumbersome.
2. The Convenience of Mac Time Machine Backups
Time Machine is one of macOS’s most useful features, allowing users to restore their data to a specific point in time through incremental backups. However, most Macs have only a single internal drive, so additional space is needed to store backup data.
Using a NAS over the local area network for backups won’t be as fast as an external drive, but since most operations involve incremental backups, the impact on efficiency is minimal. For users with a 10GbE setup, this concern becomes even less significant.
3. iCloud Limitations
iCloud makes syncing across Apple devices very convenient, but its strengths do not lie in backup and file sharing. Using it with non-Apple systems can also be cumbersome. A NAS avoids this issue, allowing access from mobile devices as well as desktops on various operating systems, and the setup cost is often more economical than iCloud’s monthly subscription fees.
4. You can run Mac Apps directly from a NAS
Most Mac apps don’t strictly need to reside on the system drive or in the Applications folder. In other words, they can be stored on a NAS. Once the NAS folder is mounted, apps can be launched directly from it, effectively saving a significant amount of space on the Mac’s internal drive.
The most basic function of a NAS is to serve as a network drive. In terms of operating system support, QNAP’s maturity integration with the Mac environment is on par with its support for Windows. Whether it’s drive mounting or applications tools support, Mac users can access NAS storage directly after logging in, making it incredibly simple to use.
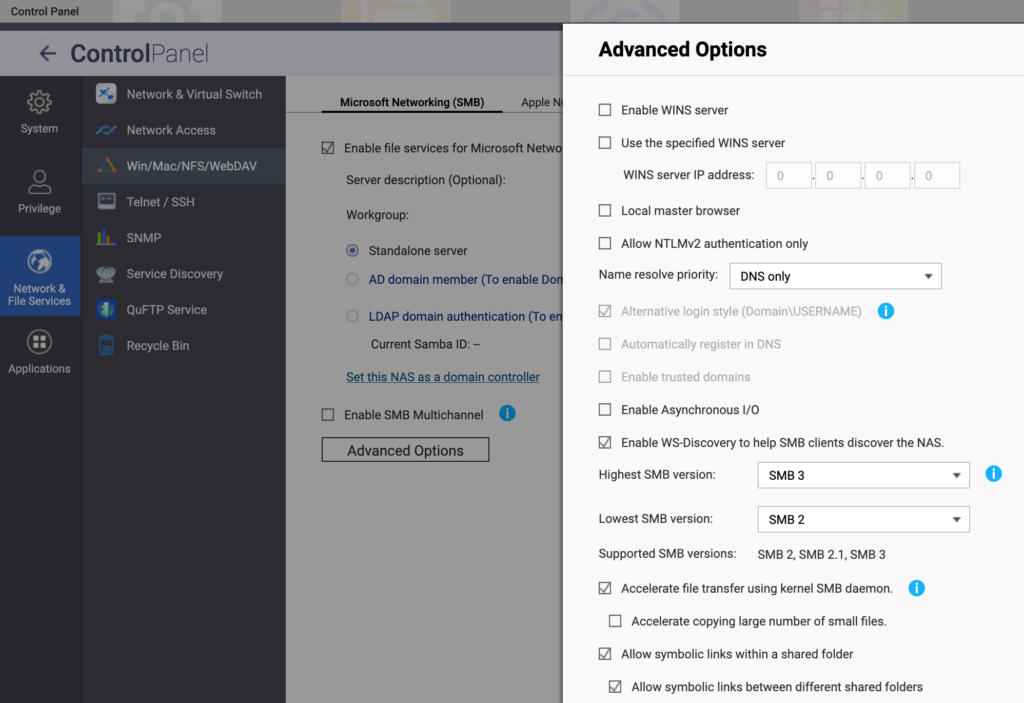
Just like accessing a NAS on Windows, the first step is to check whether the SMB protocol is enabled. Since AFP is no longer actively supported after macOS Big Sur, there’s no need to enable it. In fact, it’s recommended not to enable it, as it’s not very secure and can cause confusion.
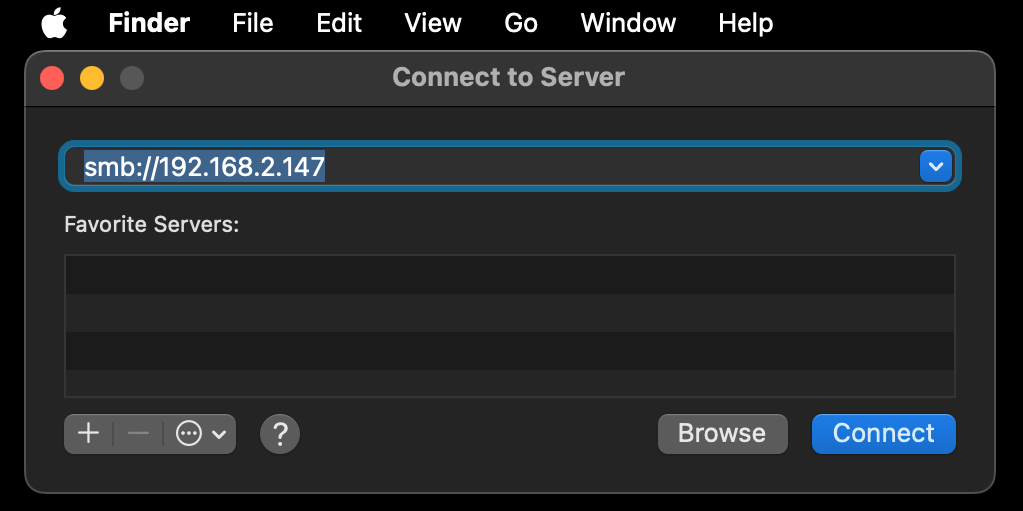
Next, in Finder, press Command + K and connect to the NAS address using the SMB protocol. Once connected, the network drive will show up in Finder.
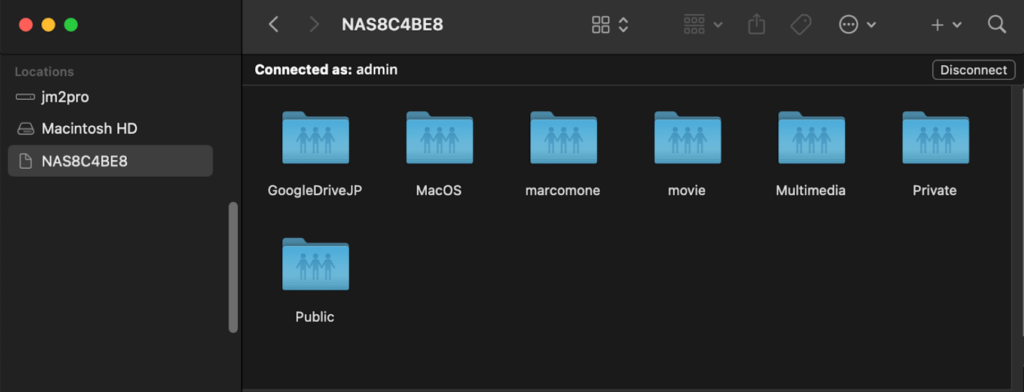
This only needs to be done once. After that, as long as the NAS is online, Finder will automatically mount it, just like accessing any local drive.
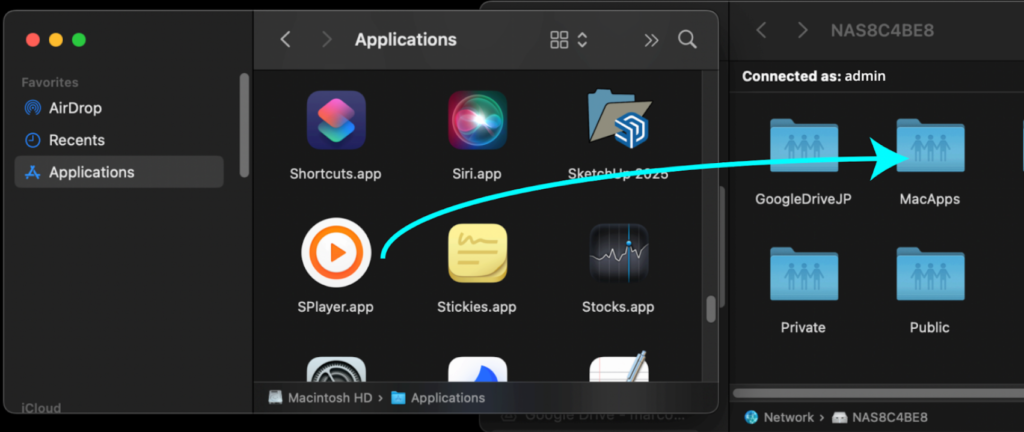
Less frequently used or smaller applications can also be moved to a NAS folder and run directly from the network drive.
In short, treating the NAS as an external hard drive is the most intuitive and straightforward approach. However, constantly moving files back and forth can be somewhat cumbersome. For example, when syncing photos with iOS devices, all multimedia content is still stored on the Mac’s system drive.Photos and videos often take up the most space. If we could set the import destination so that photos go directly to the NAS “by default”, there would be no need for tedious file transfers afterward.
There are two ways to achieve this. The simplest method is to install QuMagie directly on your mobile device, allowing you to manage photos without going through the Mac and bypassing iCloud’s storage limits. As long as the NAS has sufficient capacity, multimedia on iOS devices can be synced directly without any limits. Considering that the highest-end iPhone offers 1TB of storage and factoring in iCloud’s monthly subscription fees, storing content on a NAS is likely the more cost-effective option.
If you’re already accustomed to managing your photos with Mac’s Photos app, you can simply set the Photos library location to a folder on the NAS. This way, you can still enjoy a smooth and seamless workflow.
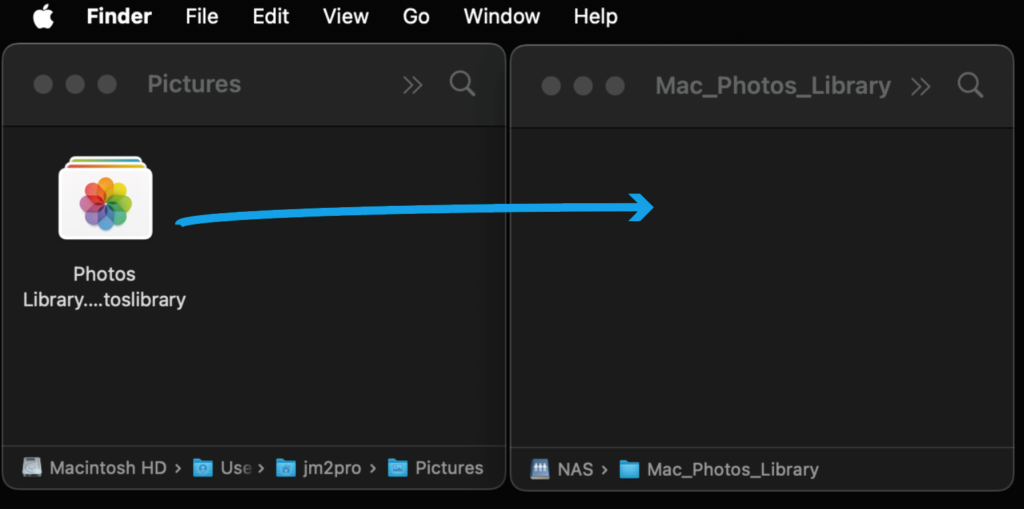
In Finder, locate your Pictures folder, where you’ll find an icon labeled “Photos Library…”. This icon represents a library that contains all the photos and videos managed by the Photos app. You can first copy this library to a folder on the NAS, and then return to delete the original from your Mac.
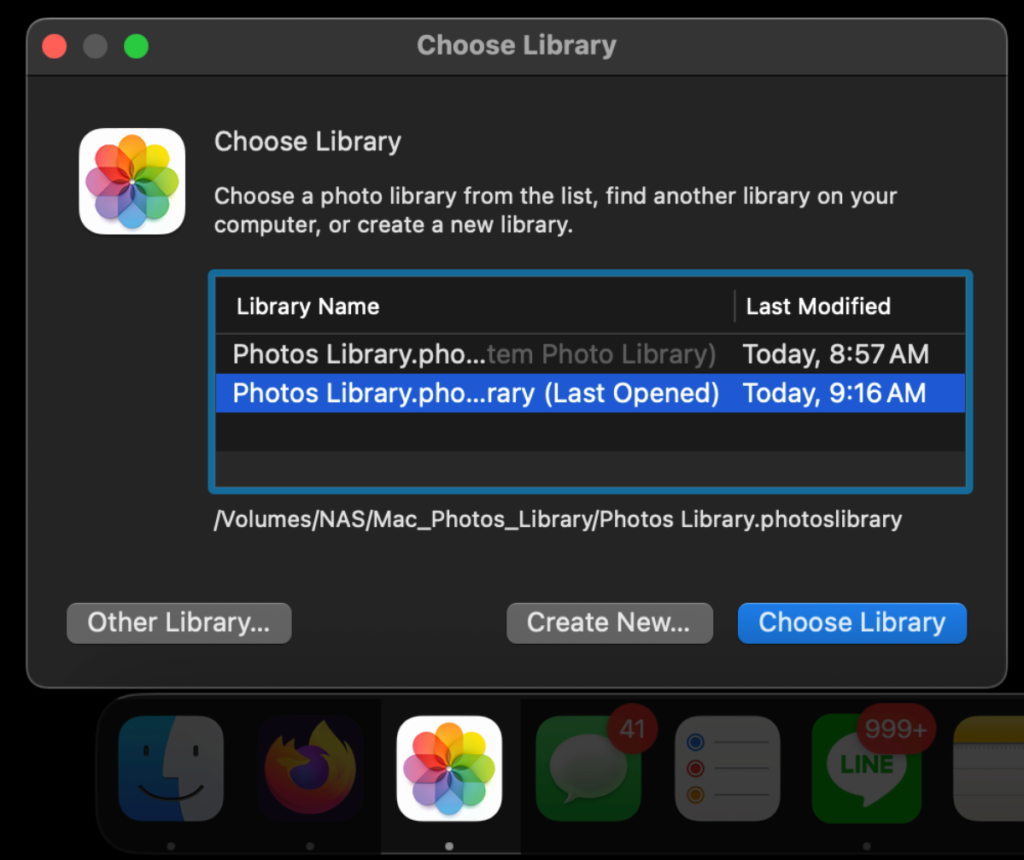
Next, hold down the Option key on your keyboard and click the Photos icon. A prompt will appear, allowing you to specify the location of your Photos library. At this point, just select the folder on your NAS. From then on, whenever you launch Photos, the app will access the library on the NAS, and any new imported photos will also be saved directly to the NAS.
This approach can definitely free up a significant amount of storage space on your Mac. Take the newly released iPhone 17 as an example: a single photo is typically 3–5MB, while shooting in RAW format can reach hundreds of MB per file, which could quickly fill up the Mac’s system drive. Storing photos and videos directly on the NAS makes space management much easier.
Mac has long offered a highly practical feature: Time Machine. It performs full system backups through incremental backups, so that later, by selecting a specific point in time, your entire Mac will be like travelling back in time, restoring the system and all data to exactly how it was at that moment.
However, for most Mac users, this feature cannot be used without an external hard drive or a NAS. The reason is simple, as mentioned at the beginning of this article: most Macs have only a single internal drive! We can’t back up the system drive onto itself!
You need at least one external hard drive for Time Machine to function. However, for MacBooks, using an external drive is far from ideal. Backing up or restoring data requires repeatedly plugging and unplugging the drive, and carrying it around is inconvenient.
A NAS can be accessed via Wi-Fi, perfectly overcoming this limitation. Time Machine uses an incremental backup strategy for each backup, meaning it only saves data that has changed. These changes are usually small and scattered, so high-speed interfaces like Thunderbolt aren’t necessary. What matters is backing up frequently and reliably. If you skip a backup because your external drive isn’t at hand, the intervals between Time Machine restore points become longer, making backups less precise and undermining the purpose of Time Machine.
If we use a NAS as the backup destination for Time Machine, as long as the network is connected, backups can be performed anytime, anywhere. Likewise, restores can be done just as easily. This not only allows for more frequent backups but also provides ample storage space. It’s recommended that Mac users set up Time Machine as the very first step after acquiring a QNAP NAS.
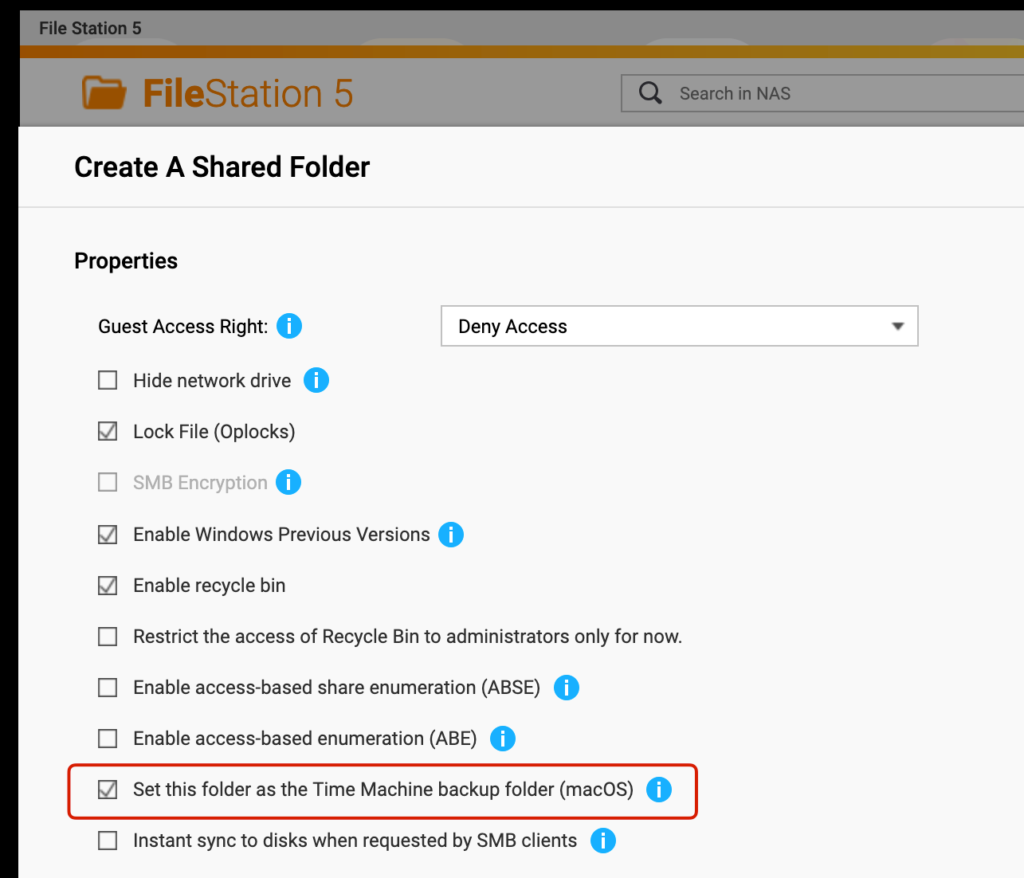
Simply create a shared folder on the QNAP NAS and, in its properties, select “Set this folder as a Time Machine backup folder (macOS)”. If this option isn’t checked, Time Machine on your Mac won’t be able to find the folder.
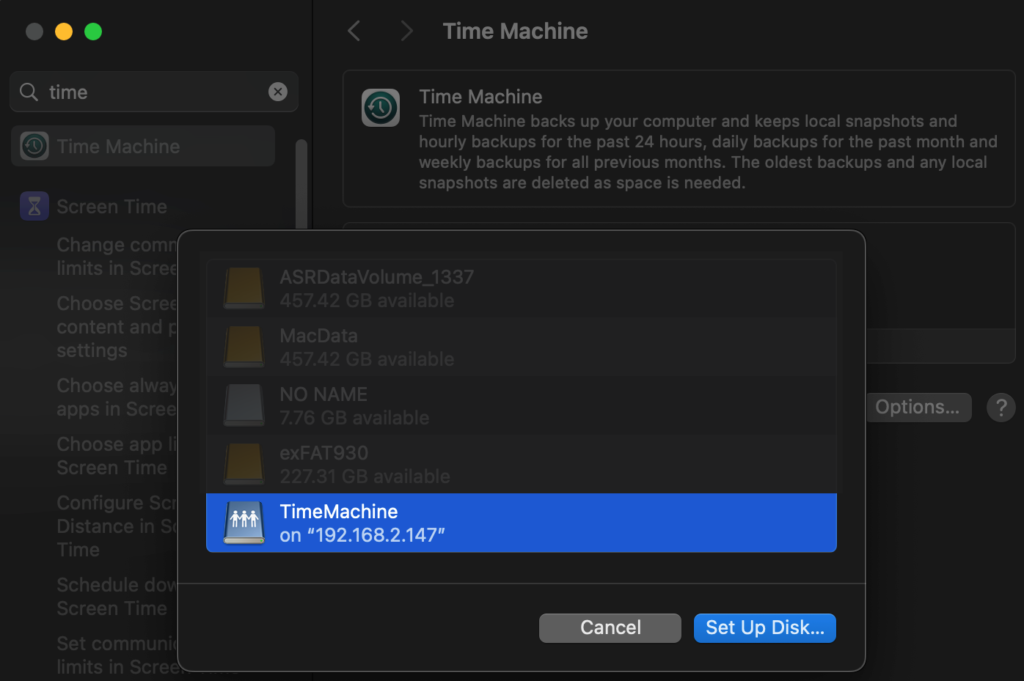
Next, go to your Mac’s System Settings and add a backup disk for Time Machine, and you should see the shared folder on the NAS. The only thing to keep in mind is that the NAS must be connected using the SMB protocol for the shared folder to appear in the list.
When using a NAS as an external drive, what performance factors should be taken into account? We can make some simple estimates based on the specifications.
Hard Drive Speed
Network Speed
Based purely on theoretical data, when using traditional hard drives in a NAS, connecting via Gigabit Ethernet (GbE) is sufficient to achieve optimal performance. If SSDs are used, 5GbE or Wi-Fi can also provide enough bandwidth.
However, unless you’re dealing with media workloads, we rarely access “large files” on the NAS directly or frequently through applications. Most tasks involve accessing smaller, fragmented data. Today, whether on Windows or Mac, the SAMBA protocol used to communicate with a NAS happens to excel in this area. When applications perform frequent random access to data over the local area network, the perceived performance isn’t significantly affected by bandwidth. This makes SAMBA protocol ideal for mounting local area network drives, allowing applications to access them directly.
When you need to transfer large volumes of data or files with bigger sizes, SAMBA become less suitable. Besides being difficult to track progress, the transfer process is prone to errors, even if the local area network speed is high. It’s recommended to enable an FTP server directly on the NAS and use FTP for file transfers, which is faster, more stable, and more reliable.
So, for users who need to do video or media editing, how can they optimize access to their source files via a NAS? We’ll explore that next time!